Are you familiar with the health impacts of radon and the best practices for mitigating its impact on building occupants? Radon is a naturally occurring radioactive gas – colorless and odorless - that comes from the breakdown of radioactive elements in soil and rocks. Without proper mitigation, the gas can enter buildings and have serious impacts on occupant health. Radon is known as the second leading cause of lung cancer behind smoking.
How do you know if you’re in an area where radon exposure is a concern? The Environmental Protection Agency (EPA) provides a map (left) showing radon zones by county.
Zone 1 has the most severe radon levels, although homes with elevated levels have been found in all areas. This is why, regardless of location, all homes should be tested. We can see from the map that in California, the most affected areas are in Santa Barbara and Ventura counties. For GreenPoint Rated (GPR) projects, radon mitigation is required for projects located in Zone 1 and recommended for Zones 2 and 3.
One of In Balance’s GPR projects, “Harry’s House”, is a multi-family senior affordable housing project in Santa Ynez (Zone 1). On recent site visits, we got a chance to look at some of the radon mitigation strategies being put into place. So, what does this look like?
The EPA provides Model Standards and Techniques for Control of Radon for various building types. For our GPR projects, we focus on the guidelines for new residential buildings, but the EPA also provides guidelines for other project types. See the EPA Radon Standards of Practice website for more information.
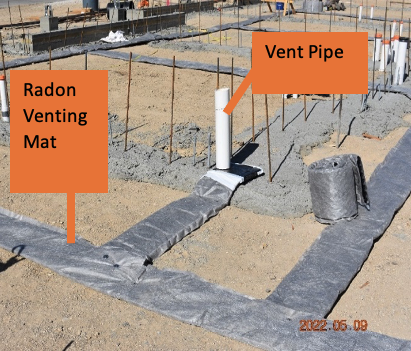
Step 1: Lay a perforated pipe in a four- to six inch continuous layer of coarse gravel under the foundation slab or on the crawlspace floor. Here, the project is using a 12” radon venting mat rolled out in a waffle pattern. A stub out for the vertical venting pipe has been placed.
Step 2: Place course gravel over radon venting mat. Lay continuous vapor barrier (6 mm minimum) over gravel – taped and sealed. Concrete will be poured directly onto vapor barrier.
Step 3: Connect the horizontal perforated pipe(s)/venting mat to a gas-tight, solid 3-4” pipe(s) running vertically from slab to the attic and through the roof for passive sub-slab/membrane depressurization. Use mechanical vent fan as required.
Other best practices
· Seal all penetrations or cracks in the slab, foundation, or crawlspace floor with caulk or adhesive sealant.
· Provide an electrical receptacle in the attic or outside the building for the future installation of a fan (for active depressurization).
· Test for radon after construction. This test can occur prior to occupancy or after occupancy. For GPR, the test must be completed by a Certified Tester as identified on the California Department of Public Health (CDPH) website. Home test kits are also widely available.
· If the test results are greater than 4 picocuries per liter (pCi/L), install onto the vent pipe an in-line continuously operating fan for active depressurization.
Using these best practices during construction can go a long way in ensuring the health and safety of building occupants. We recommend testing and implementing appropriate strategies even if it isn’t necessarily required by a certification program.


